DIY Macrame Candy Cane Ornament Tutorial (Beginner-Friendly)
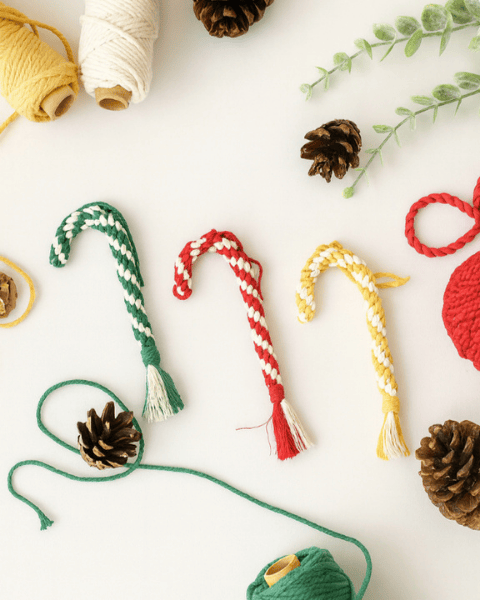
Looking for a festive and creative DIY project this Christmas? Making a Macrame Candy Cane Ornament is incredibly simple. This is the perfect beginner-friendly DIY that adds a cozy, handmade touch to your holiday décor.
This quick craft is the best way to make DIY Christmas gifts or unique additions to your own tree. This ornament offers several great benefits:
It's a quick craft you can finish in an afternoon.
It uses the easy Chinese Crown Knot—perfect for beginners learning to create spirals.
The finished product makes a beautiful, handmade gift that sells well at markets.
In this step-by-step tutorial, I'll show you exactly how to create this popular macrame Christmas decoration. If you prefer to skip the knots, you can shop the finished ornament here: https://www.samraknots.com/all-products/p/macrame-candy-cane-ornament
Watch the Full Video Tutorial
Materials & Tools You Will Need
(Contains affiliate links)
We recommend using a 3mm cord for the best stripe definition. You will need two colors to achieve the classic candy cane look.
3mm Macrame Cord:
2 × 120 cm cord (Your main working cords)
2 × 20 cm cord (Your secondary/stripe color cords)
Craft Wire (2 mm): 1 × 14 cm piece (essential for shaping the curve)
Fringe Comb
Sharp Scissors
Shop the Materials:
Cord Link: 3mm Macramé Cord: https://bobbinycords.co.uk/collections/regular-3mm-3-ply?aff=7
Tools Links:
Craft Wire (2 mm): https://amzn.to/47p3GD0
Fringe Comb: https://amzn.to/4oFMAIk
Scissors: https://amzn.to/4hsOg5l
Affiliate Disclosure: The links above are affiliate links. This means I may earn a small commission if you make a purchase through them — at no extra cost to you. Your support helps me continue creating free tutorials and improving this channel.
Step-by-Step Instructions: The Chinese Crown Knot
This tutorial shows you how to tie the Chinese Crown Knot. This knot creates the spiral stripe pattern essential for a candy cane.
1. Set Up the Cords
Fold both of your 120 cm cords in half to find the center.
Lay the two folded cords flat, crossing them at the midpoint. This setup gives you four working strands.
Tip: Ensure your primary color (the one you want to show the most) is positioned on the top or bottom, not left/right, as you begin.

2. Start the Crown Knot (The Spiral)
We will use directional terms: North (top), South (bottom), West (left), and East (right). Always start with the North cord to maintain the spiral.
Bring the North cord down over the center and place it to the left of the South cord.
Bring the South cord straight up over the cord you just moved, forming two clear loops.
Bring the West cord over the first loop and under the second loop.
Bring the East cord over the first loop and under the second loop.
Pull all four ends tightly and evenly to form your first secure Crown Knot.
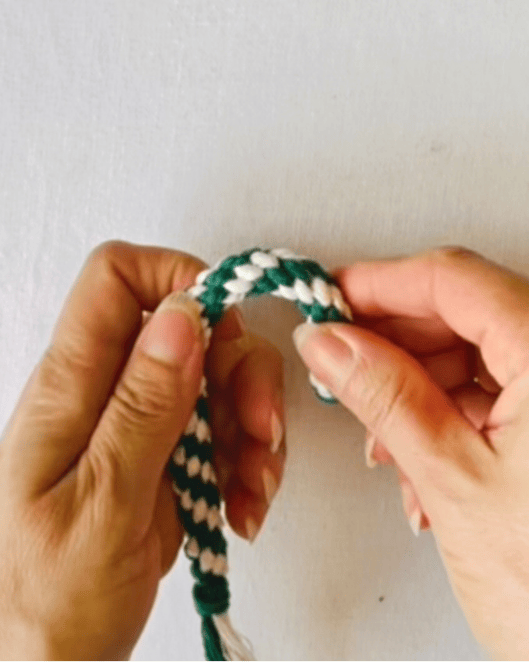
3. Knot, Spiral, and Insert Wire
Repeat the Crown Knot process (always starting with the North cord). You will see the knots naturally begin to spiral around the center.
After about 3-5 knots, gently push the 14 cm craft wire through the center of the cordwork. The wire is essential for holding the final curve.
Continue knotting until the piece is your desired length (around 15 cm is ideal for an ornament).
4. Finish and Shape
Cut the excess working cords, leaving a small tail.
Use one of the 20 cm cords to tie a Gathering Knot (or Wrapping Knot) tightly around the base to secure all the ends.
Trim the remaining ends and gently comb the fringe.
Bend the entire piece into the classic candy cane curve.
Use the other 20 cm cord to tie a simple loop at the top for hanging.
Your Macrame Candy Cane Ornament is now ready!
Troubleshooting Your Macrame Candy Cane
Even the most beginner-friendly macramé projects can have small challenges. Here are answers to common questions crafters have when making this DIY Christmas ornament:
Q: Why isn't my spiral forming correctly?
A: The Crown Knot naturally forms a spiral, but only if you always start with the same cord (e.g., always the North cord). If your spiral stops or looks uneven, check to see if you rotated your piece or accidentally started the knot with a different cord.
Q: The wire is hard to push through the cordwork.
A: This usually means you tied your Crown Knots too tightly. To fix this, you may need to gently loosen the first few knots before inserting the wire. In the future, remember to keep your tension consistent but not too tight.
Q: How do I make my stripes wider or thinner?
A: For a clean spiral, it's easiest to tie one Crown Knot per cord. For true horizontal stripes, you would need to switch to a different wrapping technique.
Tips & Variations for Your Handmade Christmas Decor
Once you master the basic macrame candy cane pattern, you can start experimenting!
Classic Look: Use red and white cord for the traditional, high-demand Christmas design. This combination always sells well at holiday craft fairs.
Boho Twist: Try green and white for a fresh look, or use your unique muted colors (mustard, pale green, blush) for a modern, bohemian Christmas ornament. These unexpected colors are perfect for standing out.
Add Scent: For an extra touch, attach a wood bead and add a drop of peppermint essential oil on the cord fringe. This gives your ornament a wonderful holiday scent.
Gift Idea: Make a full set of these quick macramé ornaments to sell as a bundled handmade gift for teachers, co-workers, or friends.
Expand Your Macrame Christmas Collection
Did you enjoy making this piece? Expanding your collection gives customers more reasons to shop at your booth!

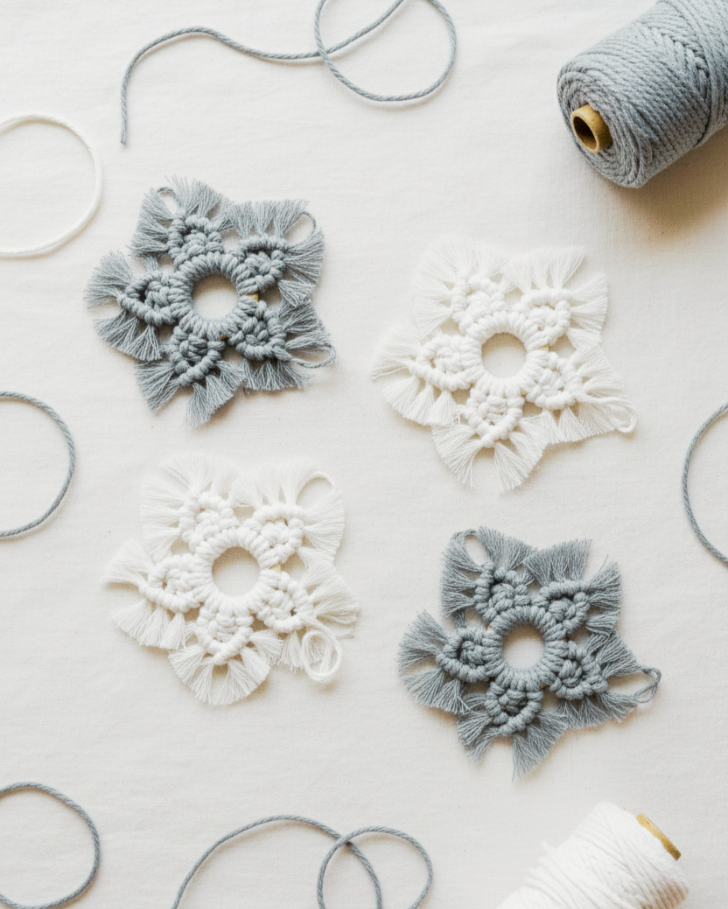
Snowflakes & Stars: Use the Square Knot and Double Half Hitch Knot to create flat, detailed shapes.
Macramé Wreaths: Small wreaths use a base ring and multiple Lark's Head Knots to create a quick, full decoration.
Mini Macramé Christmas Trees: These use rows of alternating Square Knots and fringe for a beautiful alternative to traditional ornaments.
Shop the Finished Product
No Time to Craft? If you love the cozy, handmade look but need it delivered fast, you can buy the Handmade Macrame Candy Cane Ornament directly from the shop right now!
Enjoying our macrame tutorials? Consider supporting us!

Featured Posts