DIY Macrame Coaster Tutorial for Beginners
Want to try a relaxing and creative macrame project?
In this easy tutorial, you’ll learn how to make a beautiful spiral macrame coaster using soft cotton cord and one simple, repetitive knot. This project is the perfect next step after mastering keychains, introducing you to the art of working in the round.
Why You'll Love This DIY Coaster
Beginner-Friendly and soothing to make.
A thoughtful handmade gift idea.
Adds cozy boho style to your table.
Great intro to the repetitive knotting rhythm needed for larger mats and rugs.
Quick, rewarding, and perfect for a weekend craft session.
Key Knot: The Half Knot (or Spiral Knot)
This project relies on the Half Knot, which is simply the first step of a Square Knot, repeated continuously. When repeated, this knot sequence naturally begins to twist, creating the beautiful, flat spiral shape.
Materials & Tools You Will Need
(Contains affiliate links)
3mm Macrame Cord: https://amzn.to/4oAz9ct
Fringe Comb: https://amzn.to/4oFMAIk
Scissors: https://amzn.to/476mybe
Note on Cord: You will need one long piece for the Core Cord (which runs through the center) and many shorter pieces for the Knotting Cords.
Affiliate Disclosure: The links above are affiliate links. This means I may earn a small commission if you make a purchase through them — at no extra cost to you. Your support helps me continue creating free tutorials and improving this channel.
Step-by-Step Instructions
1. Prepare Your Cords
Core Cord: Cut one cord at approximately 1.5 meters long. This is your central core that you will knot around.
Knotting Cords: Cut several cords at 80 cm each. You will start with seven of these, but you will need to cut more as your coaster grows outward.
2. Attach Cords to the Core
Fold your 80 cm knotting cords in half.
Attach them to the 1.5m Core Cord using Reverse Lark’s Head Knots.
Attach your first seven cords closely together near the center of the Core Cord.
3. Start the Spiral Pattern (The Half Knot)
The secret to the spiral coaster is repetition and consistent tension.
Setup: The central 1.5m cord becomes the Core you wrap around. The two tails of the first knotting cord are your Working Cords.
Knot: Tie one Half Knot around the Core Cord. (This is the first half of a Square Knot—e.g., left cord over, right cord under and through).
Repeat: Continue tying the Half Knot repeatedly, always starting with the same cord (e.g., always the left cord). The knotting will naturally begin to spiral around the Core Cord.
Gently Curve: As you knot, gently curve the Core Cord into a flat circular shape.
4. Add New Cords
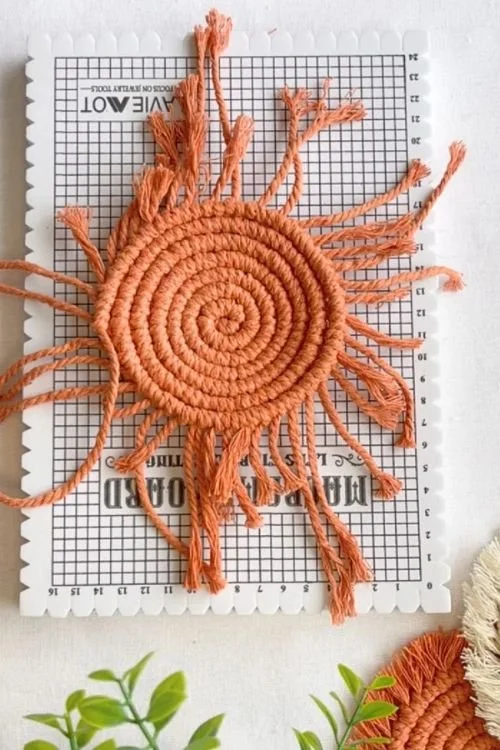
As the spiral grows outward, you must add new cords to keep the piece flat and fill the ever-widening circle.
Attach: Every few rows, fold a new 80 cm cord in half and use a Reverse Lark's Head Knot to attach it to the Core Cord before you continue knotting with your Half Knots.
Goal: Keep the knot rows snug but not tight against the row before it. Stop when your coaster reaches about 12–14 cm wide (or your preferred size).
5. Hide and Secure the Ends
The Finish: To finish the last row neatly, cut the Core Cord and all remaining knotting cord ends down to about 2-3 cm.
Tuck: Use a tapestry needle or crochet hook to carefully tuck the knotting cords and the core end under the back of the coaster.
Secure: Add a drop of glue to the back for extra durability, if desired.
6. Brush & Trim the Fringe
Brush out the ends of the knotting cords (the ones you tucked under) to create a soft, circular fringe.
Use your scissors to gently trim the fringe into a nice round, even shape.Macramé Coaster Curling Fix: How to Keep It Flat and Relaxed
This curling happened because the cords weren’t spaced evenly while knotting. Try adding extra cords in the gaps to help your macrame coaster stay flat and relaxed.
Macrame Coaster Curling Fix: How to Keep It Flat
If your macrame coaster is curling at the edges or bunching up, it's a common issue that is easy to fix!
Watch Your Tension: Pulling your knots too tightly is the number one cause of curling. Try tugging gently instead of tightly to keep the piece relaxed.
Fill in the Gaps: If you notice wide spaces between your spiral rows, it’s a sign you need to add an extra knotting cord or two to balance the structure.
Block Your Coaster: Lightly dampen the finished piece and place it under a heavy board or book to dry flat overnight. This helps the fibers relax into their new shape.
Final Trim: Brush the fringe thoroughly before trimming to help the final coaster sit more evenly.
Want to see it in action? Watch this quick macrame coaster curling fix video to learn how to adjust your tension and achieve that perfect flat finish:
Tips for Best Results
Use soft cotton cord for easy brushing
Stick to 1–2 colors for a clean look
If your coaster feels too soft, a touch of fabric stiffener can help it hold its shape.
Be patient — macrame is all about rhythm and flow
Watch the Video Tutorial
Get the full step-by-step experience with our visual guide!
How to Style or Gift Your Macrame Coaster
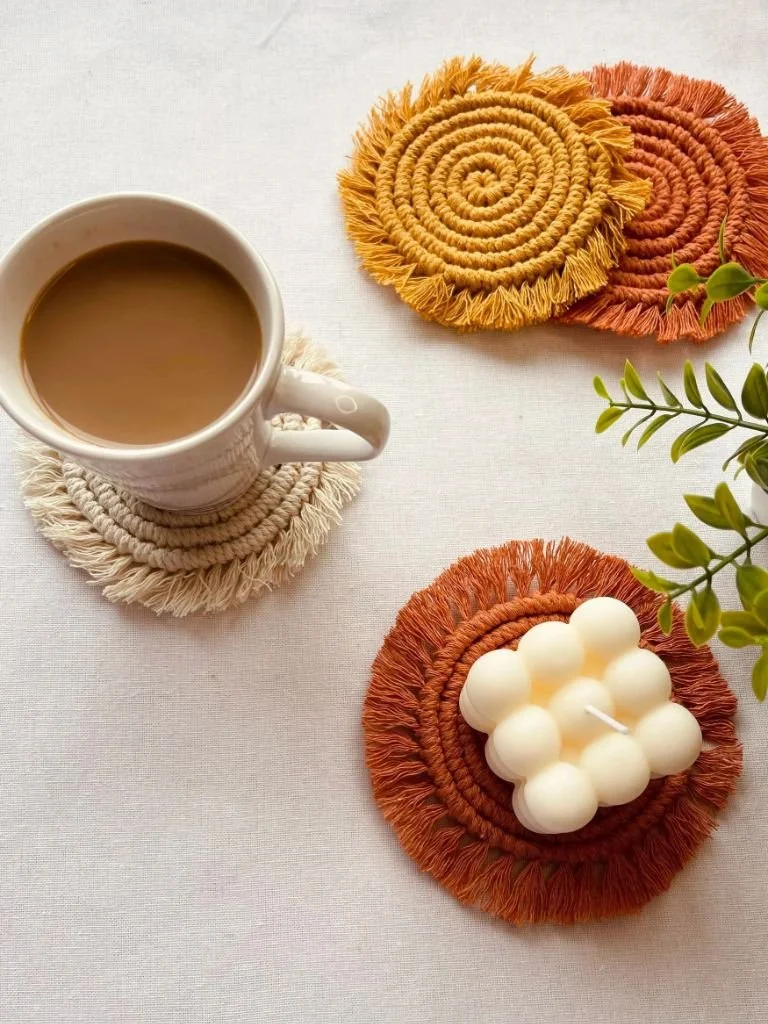
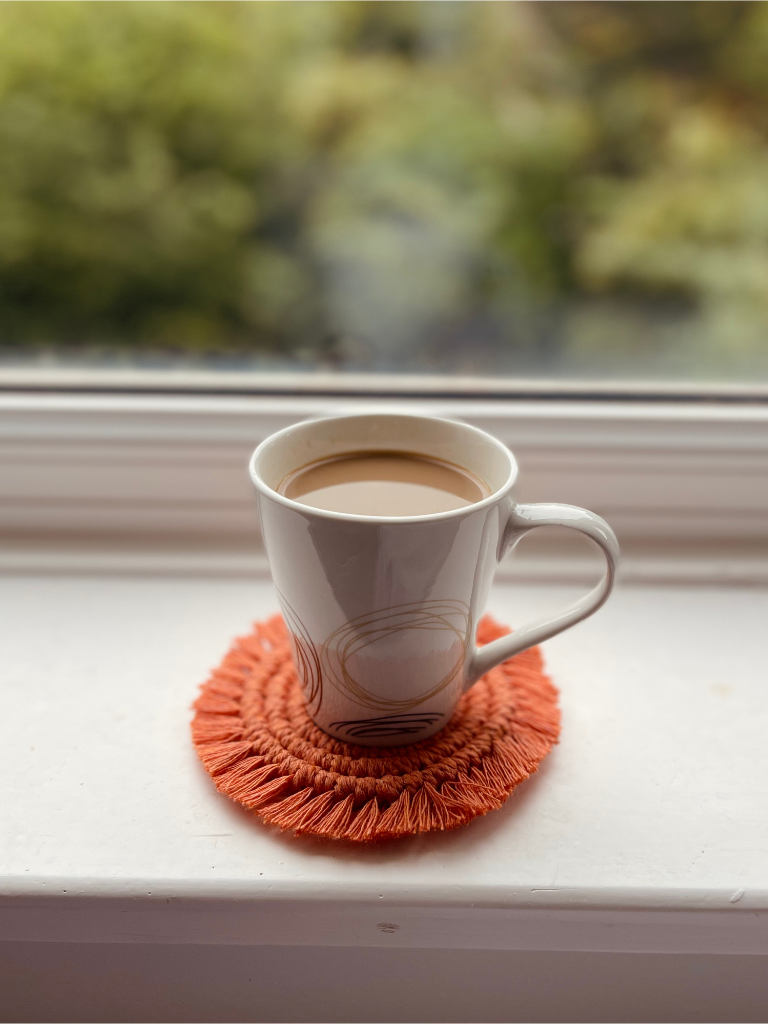
Home Decor: Place your finished coaster beneath a warm drink, by your favorite candle, or as part of a calm morning setup.
Handmade Gift: Group a few together and wrap them in craft paper for a thoughtful handmade gift idea.
Eco-Friendly: If you enjoy sustainable crafts, try using natural-dyed or recycled cotton cord for your next one.
Final Thoughts
This boho coaster DIY is more than just a craft—it’s a moment of calm. Use it in your home, gift it to someone you love, or add it to your macrame project list.
Tag @SamraKnots if you try this at home — we’d love to feature your work!
Enjoying our macrame tutorials? Consider supporting us!