DIY Macrame Dreamcatcher Tutorial | Quick & Easy Boho Decor
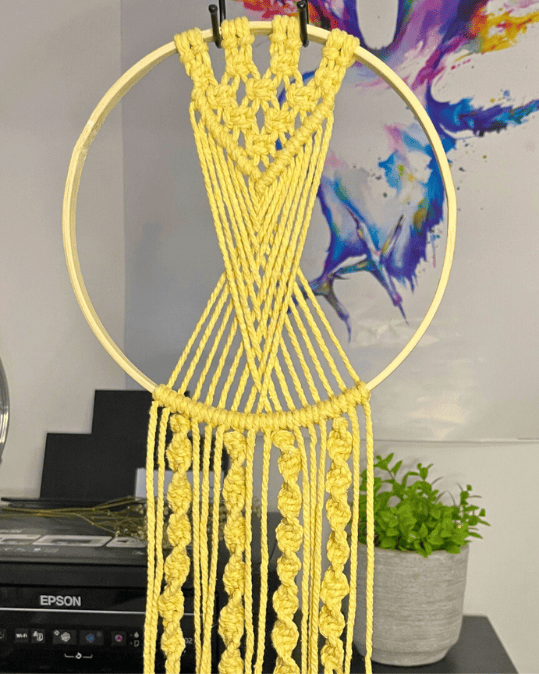
Dreamcatchers are more than just home decor—they’re symbols of protection, creativity, and cozy boho style. This project is easy and beginner-friendly. Once finished, your macrame dreamcatcher can be a perfect wall hanging, a thoughtful gift, or even a stylish car charm.
This guide will show you how to create your own macrame design that adds a beautiful touch to your space. This project is perfect whether you're new to macrame or a seasoned crafter.
Materials & Tools You Will Need
(Contains affiliate links)
You will need a mix of cord lengths to create the main hoop covering and the hanging spirals below it.
3mm Macrame Cord (Main)
8 × 180 cm cords (for the hoop top and knots)
2 × 3 m cords (for side spirals)
2 × 4 m cords (for center spirals)
Wooden Hoop
Scissors
Shop the Materials:
Cord Link: 3mm Macrame Cord: https://bobbinycords.co.uk/collections/regular-3mm-3-ply?aff=7
Wooden Hoop (20 cm / 8 inch): https://amzn.to/47qj1Do
Scissors: https://amzn.to/476mybe
Affiliate Disclosure: The links above are affiliate links. This means I may earn a small commission if you make a purchase through them — at no extra cost to you. Your support helps me continue creating free tutorials and improving this channel.
Step-by-Step Tutorial:
Step 1: Attach the Cords to the Hoop (Lark's Head Knot)
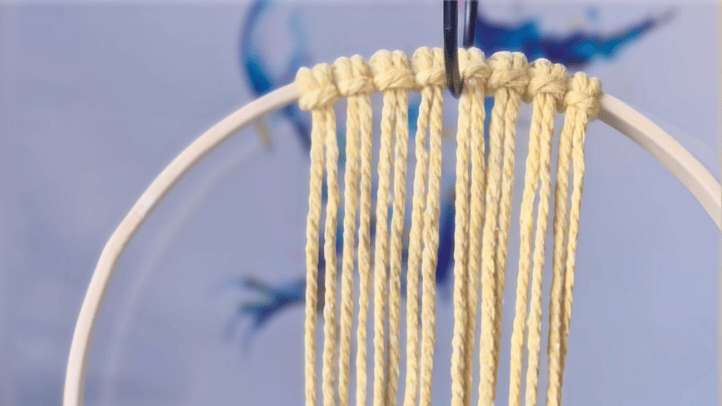
You'll start by attaching your base cords to the hoop. To do this, use a Lark's Head Knot for each of the eight 180 cm cords.
Fold one of your cords in half.
Place the folded loop behind the hoop.
Bring the two ends of the cord over the top of the hoop and thread them through the loop you created.
Pull the two ends of the cord tightly to secure the knot.
Repeat this process until you've attached all eight cords evenly around the top of the hoop. You will now have 16 hanging cords.
Step 2: Form the Top Section (Square Knots)
Now you'll use Square Knots to form the structured, textured pattern at the top of your dreamcatcher.
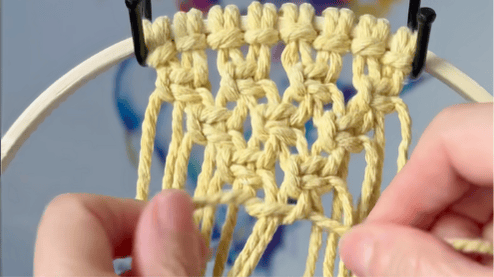
Tie Square Knot: Select the first four cords from the left. Tie one complete Square Knot (a half knot starting left, and a half knot starting right).
Continue Row: Tie a Square Knot on the next group of four cords, and so on, until you reach the end of the hoop.
Alternating Rows: For subsequent rows, skip the first two cords, and then tie your Square Knots across. This is called alternating and creates a staggered pattern.
Repeat: Continue creating 3–5 rows of alternating Square Knots across the top to add depth and structure.
Step 3: Shape the Design with Diagonal Double Half Hitch Knots
The Diagonal Double Half Hitch Knot is a beautiful, advanced beginner knot used to create straight, angled lines and secure your design. You'll use this knot to form a triangle in the center of your macrame work.
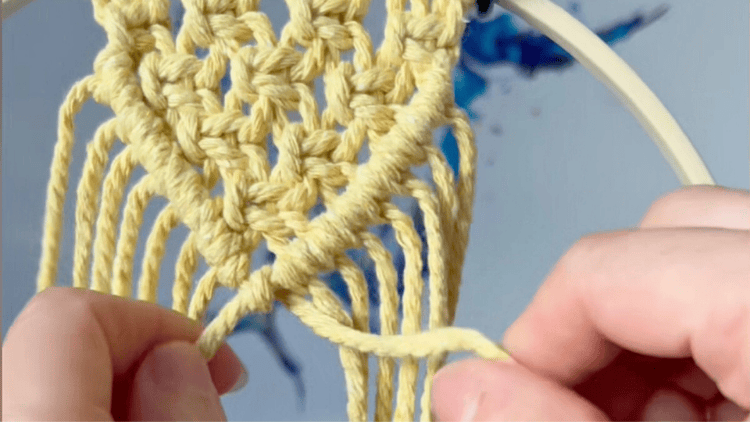
The Holding Cord: Take the far left cord from your knot work and angle it diagonally down and to the right, placing it over the remaining cords. This cord will be your non-working Holding Cord.
Knotting: Take the cord immediately next to it, and tie a Double Half Hitch Knot around the Holding Cord.
Continue the Line: Repeat the Double Half Hitch Knot with each remaining cord, working your way down the diagonal line until the triangular shape is complete.
Step 4: Create the Spiral Columns (Spiral Knot)
For this step, you'll use Spiral Knots (also known as Half Square Knots) to create the long, beautiful columns that hang down.
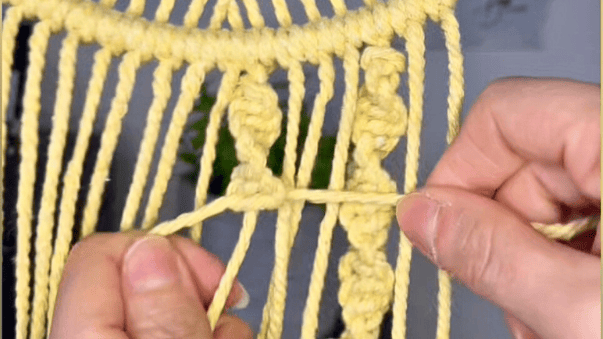
Set Cords: You will use the two 4-meter cords for the two center spirals and the two 3-meter cords for the two side spirals.
The Half Square Knot: To make a spiral knot, you will repeat the first half of a Square Knot over and over:
Take the left cord, cross it over the two middle cords, and bring the right cord under the middle cords and up through the loop.
Repeat: Repeat this motion, always starting on the same side (e.g., always the left), until you achieve the desired length. The continuous repetition will cause the knot sequence to naturally twist and spiral.

Step 5: Finishing Touches
Trim & Comb: Once all your spirals are complete, trim the remaining cords to your preferred length.
Fringe: For a soft, beautiful finish, use a comb or brush to unravel the knots at the bottom of the hanging cords.
Adjust: Adjust your knots and spirals so they hang evenly.
Caring for Your Macrame Dreamcatcher
Handmade items are made to last, and a little care goes a long way. Here are a few quick tips to keep your dreamcatcher looking beautiful:
Dusting: Gently clean your dreamcatcher from time to time with a lint roller.
Cleaning: Use a hairdryer on a low, cool setting to blow away any dust that has settled on the fringe.
Storing: When not in use, lay it flat or hang it in a cool, dry place to help it maintain its shape.
Need More Detail? For comprehensive instructions on deep cleaning, wet cleaning, and stain removal for any of your macrame pieces, check out our Ultimate Guide to Macrame Care and Cleaning.
History and Symbolism of Dreamcatchers
Dreamcatchers originated from Native American cultures. According to belief, dreamcatchers protect a sleeping person from negative energy and bad dreams. The web catches the bad dreams, while good dreams pass through the center and slide down the feathers. Your macrame dreamcatcher carries on this beautiful tradition, bringing a sense of comfort and protection to your home decor.

Styling Your Macrame Dreamcatcher
Your new dreamcatcher is a versatile piece of home decor that can bring positive energy to any room.
Wall Decor: Hang it above your bed to catch bad dreams and ensure a good night's sleep, or place it in a cozy reading nook to add boho charm. It's a great wall hanging for a nursery or living room.
Gift Idea: A handmade macrame dreamcatcher is a thoughtful gift that symbolizes protection. A truly unique present for a housewarming or birthday.
Watch the Full Video Tutorial
Prefer to follow along visually? Watch the full step-by-step video tutorial on my YouTube channel.
FAQ & Troubleshooting
Q: What type of cord is best for a macrame dreamcatcher?
We recommend using 3mm cotton macrame cord for this project. It is a perfect choice because it's soft and easy for beginners to handle, and it gives the finished dreamcatcher that full, beautiful boho texture you're looking for.
Q: What should I do if my knots are not straight?
Don't worry—getting perfect knots takes practice and patience! The key is to maintain consistent tension on your cords as you work. If a knot feels too loose, you can gently push it up to tighten it. It also helps to secure your hoop to a flat surface while working to keep everything aligned.
Q: What are some ways to hang my finished dreamcatcher?
For classic wall decor, a small nail or an adhesive hook works perfectly. For a more rustic, natural display, try hanging it from a small, decorative branch or a piece of driftwood. A dreamcatcher is also perfect for hanging from a window or above a bed to bring in positive energy.
Enjoying our macramé tutorials? Consider supporting us!